For a detail serach, try google search!!

How to submit blogger sitemap to google-useful tip for new bloggers.

This tip explains how to generate and submit blogger sitemap to google webmaster tools:
Before doing this,let me say what are sitemaps and how they will help us.The reason we use them is,they will help google bot to crawl,index pages of your site and tell you if there are any problems when they try to index it.It also helps you to know,how many pages exactly are indexed,and what people searched in the search engine to visit your site.
Let me explain the detailed procedure on how to submit your blogger sitemap to google.
1.First,go to google webmaster tools and sign in with your gmail account.
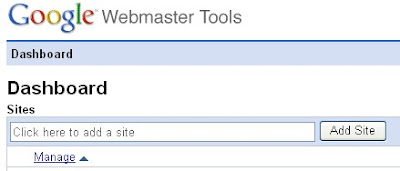
2.After you logged in, you will see this asking you to add a site.
google webmaster tools
Add your blog url(ex:kranthitips.blogspot.com).Don't add with http or www.

3.Next,it asks you to verify your site.It is just to confirm whether you are the owner or not.

CLICK on the 'verify your site' link.

click the 'verify your site' link
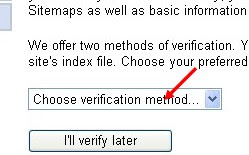
Next,

choose verification method
4.There are two ways to verify your ownership but, there is only one way for the blogger users to add a metatag.

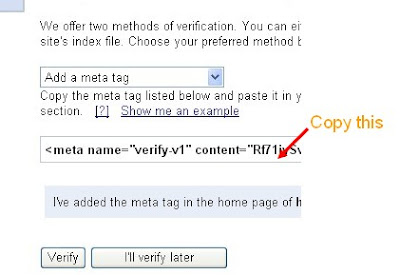
copy the metatag

5.Copy the metatag.

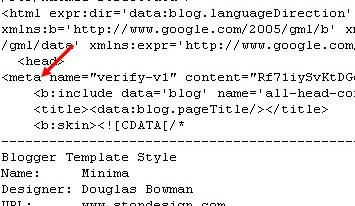
Now,sign into your blogger account>click the layout button>Edit html and paste the metatag just after the head tag and save the changes.

paste the metatag like this
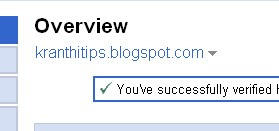
and click the verify button in the google webmaster tools and there will be a confirmation message saying that you have sucessfully verified.

conformation message

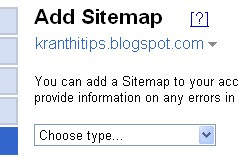
Now,you have to submit a sitemap for google to crawl your site.Go back to the google webmaster dashboard or (home) and click the 'Add' link which is next to your blog name and in the Sitemaps column.Then,you see this,

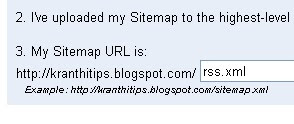
Choose 'Add general web sitemap' from the dropdown menu and type rss.xml or atom.xml next to your blog address as shown below


or

and click the 'Add General Web Sitemap' button.

6.That's it.Now your sitemap is successfully submitted to google.Check 2 or 3 days after and you will see the detailed statistics of your blog(indexed pages,any errors,etc.)

Hide blogger navbar from your blog

Learn how to hide,disable or remove the blogger navbar(navigation bar) from your blog.
First,let us see what blogger navbar is:


blogger navbar


Blogger navbar allows users to easily navigate to other random blogs and it also has a feauture to search the blogs ,and mark any blog as spam.
So,now you have a clear idea of what really a blogger navbar is.So, why so many people prefer to just remove the navbar inspite of the feautures it has like search,etc.Many people think that, it spoils the look of the blog,especially if your blog has differnet subtitle layout which looks too obvious to see for a visitor.Well, let me come to the actual point on how to disable or hide your blogger navbar.

Below is the step-by-step procedure on how to do it with photos to make it easy to understand.

1.Sign in to your blogger account and click the layout button next to your blog name

click the layout button


2.Next,click the edit html tab as shown in the below picture.


edit html


3.Add the below html code as specified in the below picture.

#navbar {
height: 0px;
visibility: hidden;
display: none;
}


add the code like this

4. Save the changes.

Now, you can see your blog without that navbar(this tip can only hides the navbar,it doesn't completely delete it).If you want the navbar to appear again,just remove that code and save the changes.

How to add adsense ads inside Blogger blog posts or between blog posts:-

Adding adsense ads inside blog posts is a very good thing to do to increase your CTR.
CTR means"(the number of times your ad clicked) divided by (number of times it is shown).So,the more CTR you have,the more $$ you get.

As we know,there are more chances for the ads to be clicked when they are in the middle(blog posts) rather than at the sidebars(especially the right sidebar),footer,etc.So,

How to place adsense ads between Blog posts:

By doing this,the adsense units will be displayed between the blog posts in the homepage,archive pages and permalink(individual post pages).
Follow the procedure to do this:

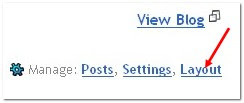
1.Sign in to your blogger dashboard>click on the layout link

click on the layout link

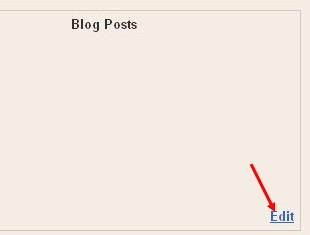
2.Click on the Edit link in the "Blog Posts' column[look at the below screenshot]
click on Edit ..............a pop up window opens..........

3.Check the box next to 'Show ads between Posts'

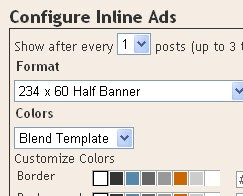
next,configure the ads,choose the format,colours,etc and SAVE THE CHANGES.
configure the ads That's it! Now your adsense ads will show between blog posts.


If you want to know how to add the adsense ads inside the blog post rather than between the post, follow this:-

Showing adsense ads inside Blogger blog Posts:-

1.Sign in to your blogger dashboard>layout>Edit html

Check the box next to 'Expand Widget Templates'


2.Scroll down the window till you see this code


3.Replace that code in the template with the below (omit the "br" opening and closing tags.)


4.Again,scroll down the template and find out data-post body tag[look at the below screenshot]
and paste the below code just above that code{this will show ads above the post body}.If you want ads to show below the post,paste the code below that tag.

Here is the code to paste(omit the "br" tag at the end):-


Thats it!!

Hack through your Acrobat reader!!

1. Go to the installation folder of Acrobat Reader
(C:\program files\adobe\acrobat\reader\..)


2. Move all the files and folders from the "plugins" directory to the "Optional" directory. ( Cut and Paste the files NOT copy & paste).


Also make sure that Acrobat Reader is not open else it will lock the files and not allow you to move the files).

Now your acrobat reader will load very fast and almost as good as notepad..

Speed up your internet by 20%

Microsoft reserves 20% of your available bandwidth for their own purposes like Windows Updates and interrogating your PC etc

You can get it back:

Click Start then Run and type "gpedit.msc" without quotes.This opens the group policy editor. Then go to:
Local Computer Policy
then Computer Configuration
then Administrative Templates then Network then QOS Packet Scheduler and then to Limit Reservable Bandwidth.

Double click on Limit Reservable bandwidth. It will say it is not configured, but the truth is under the 'Explain' tab i.e."By default, the Packet Scheduler limits the system to 20 percent of the bandwidth of a connection, but you can use this setting to override the default."
So the trick is to ENABLE reservable bandwidth, then set it to ZERO. This will allow the system to reserve nothing, rather than the default 20%.It works on Win 2000 as well
.

PC Hack :- Hide your partitions!!

This trick is for all those people who want to hide tons of data into their box. So here it is, if you have very important data in your hard drive placed in some partition which you do not want anybody to access then this trick is only for you!
Just click on start>run type gpedit.msc, now navigate through user configuration> administrative templates > windows components> windows explorer, now double click on “Hide these specified drives in My Computer” modify it accordingly then just below you will find another option “Prevent access to drives from My Computer”, double click on this option and modify it accordingly.
To make it visible again select "disable" by double clicking on the “Hide these specified drives in My Computer” option.

Lock your Desktop / Hide your Drives

Creating a desktop shortcut for locking your computer

If you use your computer in an area where others may have access to it, and there are things on your system you would rather have kept confidential, locking your desktop when you leave the computer is an essential task. Here's a recipe for a desktop shortcut that will lock your computer in two easy clicks:

Right click on an empty area of the desktop and choose 'new' then 'shortcut.' The create shortcut wizard will open; in the first text box, type '%windir%\System32\rundll32.exe user32.dll,LockWorkStation' and then give your shortcut an appropriate name on the next page, and hit 'finish.'

You will notice that the shortcut you created has a blank icon. To select a more appropriate one, right click on the shortcut and hit 'properties.' In the 'shortcut' tab, click the 'change icon' button.

In the 'look for icons in this file' box, type '%SystemRoot%\system32\SHELL32.dll' then click 'ok' to see a range of icons for your new shortcut. Choose an appropriate icon. Your desktop locking shortcut is now ready for use. Test it out.

It is useful if u have an account as it will prompt for a password.

OR

Hide all drives in my computer


Here's the registry hack to hide all the drives in my computer.

head up to
HKEY_CURRENT_USER\Software\Microsoft\Windows\CurrentVersion\Policies\Explorer
create a new DWORD value as NoDrives and modify its data to 03FFFFFF(six F's)
reboot and you are done.

To change back.
delete the key or modify the data to 0. (zero)


Lock your private folder !!Cool!!

Suppose you want to lock the folder movies in d:\ which has the path
"D:\movies"
In the same drive, create a text file and type
ren movies movies.{21EC2020-3AEA-1069-A2DD-08002B30309D}
Now save this text file as loc.bat
Create another text file and type in it
ren movies.{21EC2020-3AEA-1069-A2DD-08002B30309D} movies
Now save this text file as key.bat

2 batch files loc and key. Press loc and the folder games will change to control panel and you cannot view its contents. Press key and you will get back your original folder.
try it out!!!!!!!

Disable Turn Off Option ..and ALT+F4 option

REGEDIT->HKEY_CURRENT_USER->SOFTWARE->MICROSOFT->WINDOWS->POLICIES->EXPLORER THEN GO TO RIGHT SIDE AND BY RIGHT CLICK OF UR MOUSE CREATE NEW DWORD VALUE WITH NAME NoClose and after creating click on it and give Value Data 1.

And Reboot your pc ..now your Turn Off option is disabled ..to Enable it again ..go to that directory by regedit ..and simply delete that created NoClose and Log Off Your User and Log in again ..your Turn off Again Working

Avoid autoplay of any CD

In earlier operating systems only those CD that had autorun.inf file in their root directory were able to execute on its own but with advent of WINDOWS XP it has become possible with just about anything. Well sometimes it is good but there are other times when you want to avoid this part of automation. What would I do. Simply press SHIFT key when you enter a CD in your CD drive. It won't Auto play.

For those of you, who do want a registry hack. Here it is:
Open Registry and navigate to [HKEY_LOCAL_MACHINE\SOFTWARE\Microsoft\Windows\CurrentVersion\policies\Explorer] and look for key "NoDriveTypeAutoRun" and set its value to 185 (decimal). This would stop autoplay.

Make the shutdown quicker!!

Open Registry by going to START-RUN and typing REGEDIT. Navigate to HKEY_CURRENT_USER\CONTROL PANEL\DESKTOP and look for AutoEndTasks. On my computer default value is 0. Change it to 1. Thats all. Further more you can reduce the time it takes for Windows to issue kill directive to all active/hung applications.
In doing this only constraint that you should make sure exists is that HungAppTimeout is greater than WaitToKillAppTimeout. Change the values of WaitToKillAppTimeout to say 3500 (since default value for HungAppTimeout 5000 and for WaitToKillAppTimeout is 20000)

Stop new programs installed balloon from coming up

Right click on START button and select properties. Click on Customize and go to Advanced tab and deselect check box saying "Highlight newly installed programs". This would help you stop this annoying feature from popping up every now and then.

Multiple Yahoo Messengers in one PC


Usually we can open only one yahoo messenger at a time.So if we have multiple accounts, we may not be able to log in to all of them at the same time using a yahoo messenger.However, we can accomplish this by editing the registry a little.
Just follow these steps :-
a. Click Start button. Click Run. Type REGEDIT and enter.
b. Look for 'HKEY_CURRENT_USER' and click on + sign to expand it.
c. Then expand 'Software'. Expand 'Yahoo'. Expand 'pager'. Click on 'test'.
d. On the right side of the screen, right-click and create a 'DWORD value'. Name it as 'Plural'.
e. Double-click on it and change the value from 0 to 1.
f. Restart the system and try opening multiple yahoo messengers.

Hack Rapidshare without any software


When you are a free user, you often need to wait a lot before downloading the file.Ofcourse, if its a few minutes then its ok..but as the wait time gets longer..we feel really pissed off.
Now all you have to do is follow these steps :
a. Copy the URL of the rapidshare site and disconnect from the net.
b. Clear your Cookies.
For Mozilla firefox users, go to Tools--Options--Privacy--Settings--Cookies
Check the Cookies tab then Apply then OK.
Press Clear Private Data from the Tools Menu.
c. Now that your Cookies have beeen cleared, WAIT for a couple of minutes. This is for your ISP to issue
you another IP address.
d. Now Connect the net and go for the download again.This time there will be no waiting tag...


Speed up loading your menus

This is a very effective trick. Try it out and you will feel the difference!!

Go to Start then Run
Type 'Regedit' then click 'Ok'
Find "HKEY_CURRENT_USER\Control Panel\Desktop\"
Select "MenuShowDelay"
Right click and select "Modify'
Reduce the number to around "100"
This is the delay time before a menu is opened. You can set it to "0" but it can make windows really hard to use as menus will open if you just look at them - well move your mouse over them anyway. You may go anywhere between 50-150 depending on your mood.

Pop a message when system boots

To pop a banner which can contain any message you want to display just before a user is going to log on, go to the key: HKEY_LOCAL_MACHINE\SOFTWARE\Microsoft\Windows\CurrentVersion\WinLogon Now create a new string Value in the right pane named LegalNoticeCaption and enter the value that you want to see in the Menu Bar. Now create yet another new string value and name it:LegalNoticeText.
Modify it and insert the message you want to display each time Windows boots. This can be effectively used to display the company's private policy each time the user logs on to his NT box. It's .reg file would be: REGEDIT4 [HKEY_LOCAL_MACHINE\SOFTWARE\Microsoft\Windows\CurrentVersion\Winlogon] "LegalNoticeCaption"="Caption here."

Run Commands In Windows XP

You can access all these programs by going through START/RUN or Simply Click Windows Key+r...

  1. SQL Client Configuration - cliconfg

  2. System Configuration Editor - sysedit

  3. System Configuration Utility - msconfig

  4. System File Checker Utility (Scan Immediately)- sfc /scannow

  5. System File Checker Utility (Scan Once At Next Boot)- sfc /scanonce

  6. System File Checker Utility (Scan On Every Boot) - sfc /scanboot

  7. System File Checker Utility (Return to Default Setting)- sfc /revert

  8. System File Checker Utility (Purge File Cache)- sfc /purgecache

  9. System File Checker Utility (Set Cache Size to size x)-sfc/cachesize=x

  10. System Information - msinfo32.

  11. Task Manager – taskmgr

  12. System Properties - sysdm.cpl

  13. Task Manager – taskmgr

  14. TCP Tester - tcptest

  15. Telnet Client - telnet

  16. Tweak UI (if installed) - tweakui

  17. User Account Management- nusrmgr.cpl

  18. Utility Manager - utilman

  19. Windows Address Book - wab

  20. Windows Address Book Import Utility - wabmig

  21. Windows Backup Utility (if installed)- ntbackup

  22. Windows Explorer - explorer

  23. Windows Firewall- firewall.cpl

  24. Windows Magnifier- magnify

  25. Windows Management Infrastructure - wmimgmt.msc

  26. Windows Media Player - wmplayer

  27. Windows Messenger - msmsgs

  28. Windows Picture Import Wizard (need camera connected)- wiaacmgr

  29. Windows System Security Tool – syskey

  30. Windows Update Launches - wupdmgr

  31. Windows Version (to show which version of windows)- winver

  32. Windows XP Tour Wizard - tourstart

  33. Wordpad - write

  34. Password Properties - password.cpl

  35. Performance Monitor - perfmon.msc

  36. Phone and Modem Options - telephon.cpl

  37. Phone Dialer - dialer

  38. Pinball Game - pinball

  39. Power Configuration - powercfg.cpl

  40. Printers and Faxes - control printers

  41. Printers Folder – printers

  42. Private Character Editor - eudcedit

  43. Quicktime (If Installed)- QuickTime.cpl

  44. Real Player (if installed)- realplay

  45. Regional Settings - intl.cpl

  46. Registry Editor - regedit

  47. Registry Editor - regedit32

  48. Remote Access Phonebook - rasphone

  49. Remote Desktop - mstsc

  50. Removable Storage - ntmsmgr.msc

  51. Removable Storage Operator Requests - ntmsoprq.msc

  52. Resultant Set of Policy (XP Prof) - rsop.msc

  53. Scanners and Cameras - sticpl.cpl

  54. Scheduled Tasks - control schedtasks

  55. Security Center - wscui.cpl

  56. Services - services.msc

  57. Shared Folders - fsmgmt.msc

  58. Shuts Down Windows - shutdown

  59. Sounds and Audio - mmsys.cpl

  60. Spider Solitare Card Game - spider

  61. Malicious Software Removal Tool - mrt

  62. Microsoft Access (if installed) - access.cpl

  63. Microsoft Chat - winchat

  64. Microsoft Excel (if installed) - excel

  65. Microsoft Frontpage (if installed)- frontpg

  66. Microsoft Movie Maker - moviemk

  67. Microsoft Paint - mspaint

  68. Microsoft Powerpoint (if installed)- powerpnt

  69. Microsoft Word (if installed)- winword

  70. Microsoft Syncronization Tool - mobsync

  71. Minesweeper Game - winmine

  72. Mouse Properties - control mouse

  73. Mouse Properties - main.cpl

  74. Nero (if installed)- nero

  75. Netmeeting - conf

  76. Network Connections - control netconnections

  77. Network Connections - ncpa.cpl

  78. Network Setup Wizard - netsetup.cpl

  79. Notepad - notepad

  80. Nview Desktop Manager (If Installed)- nvtuicpl.cpl

  81. Object Packager - packager

  82. ODBC Data Source Administrator- odbccp32.cpl

  83. On Screen Keyboard - osk

  84. Opens AC3 Filter (If Installed) - ac3filter.cpl

  85. Outlook Express - msimn

  86. Paint – pbrush

  87. Keyboard Properties - control keyboard

  88. IP Configuration (Display Connection Configuration) - ipconfi/all

  89. IP Configuration (Display DNS Cache Contents)- ipconfig /displaydns

  90. IP Configuration (Delete DNS Cache Contents)- ipconfig /flushdns

  91. IP Configuration (Release All Connections)- ipconfig /release

  92. IP Configuration (Renew All Connections)- ipconfig /renew

  93. IP Configuration(RefreshesDHCP&Re-RegistersDNS)-ipconfig/registerdns

  94. IP Configuration (Display DHCP Class ID)- ipconfig/showclassid

  95. IP Configuration (Modifies DHCP Class ID)- ipconfig /setclassid

  96. Java Control Panel (If Installed)- jpicpl32.cpl

  97. Java Control Panel (If Installed)- javaws

  98. Local Security Settings - secpol.msc

  99. Local Users and Groups - lusrmgr.msc

  100. Logs You Out Of Windows - logoff.....

  101. Accessibility Controls - access.cpl

  102. Accessibility Wizard - accwiz

  103. Add Hardware - Wizardhdwwiz.cpl

  104. Add/Remove Programs - appwiz.cpl

  105. Administrative Tools control - admintools

  106. Adobe Acrobat (if installed) - acrobat

  107. Adobe Designer (if installed)- acrodist

  108. Adobe Distiller (if installed)- acrodist

  109. Adobe ImageReady (if installed)- imageready

  110. Adobe Photoshop (if installed)- photoshop

  111. Automatic Updates - wuaucpl.cpl

  112. Bluetooth Transfer Wizard – fsquirt

  113. Calculator - calc

  114. Certificate Manager - certmgr.msc

  115. Character Map - charmap

  116. Check Disk Utility - chkdsk

  117. Clipboard Viewer - clipbrd

  118. Command Prompt - cmd

  119. Component Services - dcomcnfg

  120. Computer Management - compmgmt.msc

  121. Control Panel - control

  122. Date and Time Properties - timedate.cpl

  123. DDE Shares - ddeshare

  124. Device Manager - devmgmt.msc

  125. Direct X Control Panel (If Installed)- directx.cpl

  126. Direct X Troubleshooter- dxdiag

  127. Disk Cleanup Utility- cleanmgr

  128. Disk Defragment- dfrg.msc

  129. Disk Management- diskmgmt.msc

  130. Disk Partition Manager- diskpart

  131. Display Properties- control desktop

  132. Display Properties- desk.cpl

  133. Display Properties (w/Appearance Tab Preselected)- control color

  134. Dr. Watson System Troubleshooting Utility- drwtsn32

  135. Driver Verifier Utility- verifier

  136. Event Viewer- eventvwr.msc

  137. Files and Settings Transfer Tool- migwiz

  138. File Signature Verification Tool- sigverif

  139. Findfast- findfast.cpl

  140. Firefox (if installed)- firefox

  141. Folders Properties- control folders

  142. Fonts- control fonts

  143. Fonts Folder- fonts

  144. Free Cell Card Game- freecell

  145. Game Controllers- joy.cpl

  146. Group Policy Editor (XP Prof)- gpedit.msc

  147. Hearts Card Game- mshearts

  148. Help and Support- helpctr

  149. HyperTerminal- hypertrm

  150. Iexpress Wizard- iexpress

  151. Indexing Service- ciadv.msc

  152. Internet Connection Wizard- icwconn1

  153. Internet Explorer- iexplore

  154. Internet Setup Wizard- inetwiz

  155. Internet Properties- inetcpl.cpl
Make your Firefox Faster!!

Type about:config in the address bar, Then look for the following entries, and make the corresponding changes.
  1. network.http.max-connections-per-server =32

  2. network.http.max-persistent-connections-per-proxy =16

  3. network.http.max-connections = 64

  4. network.http.max-persistent-connections-per-server = 10

  5. network.http.pipelining = true

  6. network.http.pipelining.maxrequests = 200

  7. network.http.request.max-start-delay = 0

  8. network.http.proxy.pipelining = true

  9. network.http.proxy.version = 1.0

Lastly right-click anywhere and select New- Integer. Name it nglayout.initialpaint.delay and set its value to 0. This value is the amount of time the browser waits before it acts on information it recieves.Enjoy!!

Make Your Windows Faster!!


Disable CD Autorun


( WinXP PRO Only)

1) Click Start, Run and enter GPEDIT.MSC

2) Go to Computer Configuration, Administrative Templates, System.

3) Locate the entry for Turn autoplay off and modify it as you desire.


Speed Up Browsing


When you connect to a web site your computer sends information back and forth. Some of this information deals with resolving the site name to an IP address, the stuff that TCP/IP really deals with, not words. This is DNS information and is used so that you will not need to ask for the site location each and every time you visit the site. Although Windows XP and Windows XP have a pretty efficient DNS cache, you can increase its overall performance by increasing its size. You can do this with the registry entries below:

Windows Registry Editor Version 5.00
[HKEY_LOCAL_MACHINE\SYSTEM\CurrentControlSet\Services\Dnscache\Parameters]
"CacheHashTableBucketSize"=dword:00000001
"CacheHashTableSize"=dword:00000180
"MaxCacheEntryTtlLimit"=dword:0000fa00
"MaxSOACacheEntryTtlLimit"=dword:0000012d

Make a new text file and rename it to dnscache.reg. Then copy and paste the above into it and save it. Merge it into the registry.


DISABLE INDEXING SERVICES

Indexing Services is a small little program that uses large amounts of RAM and can often make a computer endlessly loud and noisy. This system process indexes and updates lists of all the files that are on your computer. It does this so that when you do a search for something on your computer, it will search faster by scanning the index lists. If you don't search your computer often, or even if you do search often, this system service is completely unnecessary. To disable do the following:

1. Go to Start
2. Click Settings
3. Click Control Panel
4. Double-click Add/Remove Programs
5. Click the Add/Remove Window Components
6. Uncheck the Indexing services
7. Click Next


OPTIMISE DISPLAY SETTINGS


Windows XP can look sexy but displaying all the visual items can waste system resources. To optimize:

1.Go to Start
2. Click Settings
3. Click Control Panel
4. Click System
5. Click Advanced tab
6. In the Performance tab click Settings
7. Leave only the following ticked:
- Show shadows under menus
- Show shadows under mouse pointer
- Show translucent selection rectangle
- Use drop shadows for icons labels on the desktop
- Use visual styles on windows and buttons.


SPEEDUP FOLDER BROWSING


You may have noticed that everytime you open my computer to browse folders that there is a slight delay. This is because Windows XP automatically searches for network files and printers everytime you open Windows Explorer. To fix this and to increase browsing significantly:

1. Open My Computer
2. Click on Tools menu
3. Click on Folder Options
4. Click on the View tab.
5. Uncheck the Automatically search for network folders and printers check box
6. Click Apply
7. Click Ok
8. Reboot your computer


REMOVE ANNOYING DELETE CONFIRMATION MESSAGES

Although not strictly a performance tweak I love this fix as it makes my machine 'feel' faster. I hate the annoying 'are you sure?' messages that XP displays, especially if I have to use a laptop touchpad to close them. To remove these messages:

1. Right-click on the 'Recycle Bin' on the desktop and then click 'Properties'
2. Clear the 'Display Delete Confirmation Dialog' check box and click 'Ok'

If you do accidently delete a file don't worry as all is not lost. Just go to your Recycle Bin and 'Restore' the file.

Check it out!!

Find who is Invisible on Yahoo messenger

Sometimes some of your friends who appear offline in yahoo messenger may not be actually offline, they may in the 'Invisible' mode. This maybe if they are trying to ignore you or are too busy to talk to anyone.
There is this small trick that you can use to find out what the truth is.

Firstly open your yahoo messenger main window and double click on the name of the person whom you want to check. The chat window will open obviously.

Click IMVironment button, select See all IMVironments, select Yahoo! Tools or Interactive Fun, and click on Doodle.
After loading the Doodle imvironment there can be two possibilities

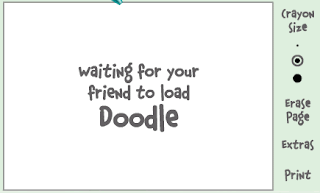
1.If the user is offline Doodle are will show this "waiting for your friend to load Doodle" continuously .See in the picture below:

2. If the user is online (but in invisible mode), after few seconds (it can take up to one minute, depending on your connection speed), you should get a blank page like in the picture below. So you know that the user is online.

Check it out!!